Follow this blog with bloglovin

Follow If Its Groovy

Translate

June 21, 2011

Raisin Boat: Hey Cupcake with Jen

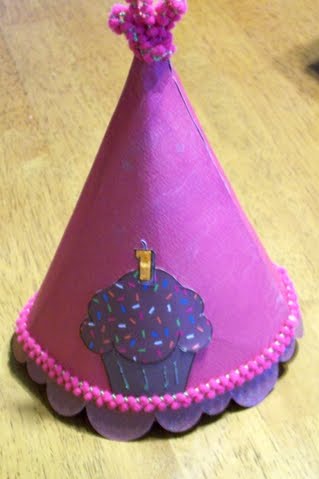
Let me tell you how much fun I had using this Raisin Boat Hey Cupcake stamp set!!!I used the cupcakes on my baby daughters birthday banner and her birthday hat. I just simply stamped on patterned and solid paper and cut the cupcakes out and added it to the banner and hat I decorated. Tfl!

Here is the stamp set:


June 20, 2011

Raisin Boat: Highly Confidential with Deborah

See that cute little "Approved" stamp? I can just see it now sitting on an old timey desk and in walks the husband and I stamp him lol!!!
Deb♥

Here is the stamp set:


Raisin Boat: Breezy Butterflies/Formal Phrases with Silvana

For this card I chose orange, green and beige colors and stamped the butterfly from the Breezy Butterflies set to match my papers and the thinking of you phrase from the Formal Phrases set to add a sentiment. Love this butterfly!!!! The set comes with a base same shape butterfly which I used with orange ink and for the top I uses black ink and some orange pearls.


Here are the stamps:


June 19, 2011

Raisin Boat: Crossword Puzzle with Heather

Oh my goodness, do I love this crossword stamp by Raisin Boat! I think it can be used for so many things . . . not just layouts of people doing crosswords or even just for cards. On this layout of my little sister and I, I was going for more of a whimsical look then my normal distressed look. Going along with the Crate Paper Seasons collection, I thought the stamp matched and went along with this collection perfectly. Do either my sister or I like crossword puzzles . . . NOPE! But it didn't matter, it was the perfect stamped paper for the layout . . . in my opinion! lol!Here is the stamp set:


Raisin Boat: Big Rig Party with Deborah


Since my husband has spent a lot of time on the road lately, I chose to make him a card for Father's Day using a truck stamp from Big Rig Party. Much of his day is spent between a van or a truck very similar to this one :)
Deb♥


Here is the stamp set:


Here is my card:

June 18, 2011

Raisin Boat: Lawn King with Michelle

Here is the stamp set:


Raisin Boat: Brick with Darlene

For a fun and cute look, try Raisin Boat's Brick background stamp and some paint on your next layout or card! This Brick background stamp was so perfect for this layout. I loved how I could use chalk ink in between the brick lines to really get some extra color in the brick.


Here is the stamp:


June 17, 2011

Raisin Boat: Imagine with Deborah

One of the moments that have become unforgettable to me as a mother was the day my daughter chose to be baptized. A few years earlier I had both of my girls dedicated, but I was overjoyed when Kristen chose to follow God herself. Happy Momma! To scrapbook one of the pics from that awesome day I chose to use the Imagine stamp set. Butterflies are so beautiful and a real example of how things in life can change so I knew they were the perfect fit for this layout. TFL!
Deb♥


Here is the stamp set:


Raisin Boat: Alpha Bold with Doreen

I love stamps for titles but have a lot of trouble getting them to line up straight. My solution? Punch out circles and stamp the letters onto the circles. Since the circles have no straight edges, you can stamp on them any way and they will not appear crooked! Lastly just draw a light line on your layout and use it as your guide as you glue the circles/letters down.

Here is the stamp set:


June 16, 2011

Meet Raisin Boat!


I am so thrilled to bring to you an interview today from Raisin Boat. If you have not met yet they are a stamp rental (and sales) company and just amazing!!! We, the designers of If It's Groovy, have been playing with their stamps for weeks now, and will be showing you so many projects using them that I can hardly contain my excitement! I hope you will feel inspired! I will be waiting to hear what you think, in fact after all projects have shown I will toss the names of each person who leaves a comment into a hat so that you too can enjoy Raisin Boat Stamps, generously donated for YOU! Each comment will earn you more chances. Cool right?

You can find them here and if you would like to visit and "like" them on Facebook go here.

Now let me introduce you to Kim and Bobbi!!!
Deb♥


Hi Kim and Bobbi! Thanks for taking time from your day to answer a few questions!

First, please tell us about you!

We both grew up in the Madison, WI area and are now raising our families here, too – yes, despite the chilly winters! J Kim is married to Mike and has a 10-year-old daughter, Bella, and a 6-year-old daughter, Alayna. Bobbi is married to Kevin and has nearly-9-year-old twins, Olivia and Tarek. We both left jobs in corporate marketing to start up Raisin Boat.

How did you start Raisin Boat? How did you decide on the cute name?

We’ve always loved stamping and scrapbooking, and we found ourselves constantly loaning out stamp sets to friends and vice versa. It just gets impossible to buy and store every single stamp set you’d ever want to use, especially since occasions and design trends change all the time! We thought rental would be a great solution – it gives access to sets for almost any given project or need without the forever-long commitment. Plus there’s no more guilt in using a set for just one image or one creation!

The name gets us a lot of raised eyebrows, but it really does have a meaningful explanation! If you take our kids’ first names and shuffle them around, you get the acronym BOAT. We’re “raisin” our kids to dream and to take a leap of faith for their passions in life like we’ve done with Raisin Boat.

Stamp Rentals? Genius idea! Can you explain a little about how it works?
Our rental service is really easy to use! Our renters just pick a plan (based on how many sets they want out at a time per month). Then they make their own Pick List of the sets they want, in the order they’d like to receive them. We ship sets out with a postage-paid return envelope, and they send them back whenever they’re done for the next ones on their Pick List! All of our plans include shipping both ways, so it’s such an affordable and fun way to stamp and scrap!
 
If a customer finds that they cannot part with the stamp set they are renting can they purchase that set?
Yes! In fact, they get an extra good deal doing this! By clicking “Buy this rental set” next to the checked-out set name in their Pick List, they keep it at a 20% discount and zero shipping cost since it’s already in their hands. Plus they automatically get the next rental on their Pick List as a replacement – no matter how many sets they’ve already received that month!

By the way, we also sell brand-new, unused sets that are not part of our rental circulation. If renters want to buy a totally new set, they still get a 20% discount on it but they do pay the shipping charge in this case. And we should also note that anyone can buy from Raisin Boat – not just renters!

So, we’re really kind of like the “library” and the “bookstore”!

What are your stamps made from?
Our stamps are made of clear photopolymer. This was the clear choice for us (sorry, couldn’t resist!) when we started producing Raisin Boat stamps because the transparent material allows such easy, error-proof positioning when making projects. (We all know how frustrating it is to stamp with a wood block and end up with a crooked phrase when the rest of the card is all done!)

It was also a storage decision – clear stamps take up so little space, and they’re lightweight to haul off to scrapbooking getaways and such. We store each of our own personal Raisin Boat stamp sets inside a plastic CD case. The stamps cling naturally to the case – so slick.

We know there are really bad clear stamps out there, but our customers will tell you that Raisin Boat sets stamp cleanly and crisply and hold ink like a true rubber stamp. If you want to try them out for yourself, our rental introductory trial is a perfect way to give them a test drive!

Because a customer will be using the stamps and sending them back to you, does it matter that stains may show on the stamps before returning? Do you recommend a special way of cleaning them?
It doesn’t matter at all! Every stamp on the market “stains”, often on the very first use – but that doesn’t change how well it stamps.

When sets are returned to us, we have a team that very thoroughly cleans the stamps with professional solution and refreshes the entire packaging before they go back into circulation. So even though some of the images may be stained, no one ever needs to be concerned about getting “dirty” stamps. And there’s also no need to worry about staining the stamps – we want you to use them and have fun with them!

To clean stamps before returning them, you can simply wipe them off gently with a damp rag or stamp cleaner like you would with any other stamp. If a stamp doesn’t feel as sticky as usual, it can be restored by swishing it in warm water and mild liquid soap.

How often do you release new stamp sets?
For the last year, we’ve released a new stamp set nearly every week to reach our current total of over 210 exclusive Raisin Boat sets. During the upcoming summer months, we’ll turn our focus to other exciting new product developments and preparations for the CHA trade and consumer show, but we’ll start right back up again with a series of new weekly releases in the fall. We’re always working on new set designs!

Thanks for letting us learn more about you and Raisin Boat, thanks for the opportunity to show you how we loved creating with your stamps, thanks for the sponsorship! You rock~!
Deb♥


See you tomorrow with the first project!!!

June 15, 2011

Friends :)

This makes me smile!!! Every lady needs a girlfriend :)
Deb♥


On my layout "Friends Make Your Heart SING", the music notes were a touch that I just had to have! Though I may not be musical, my dear friend Shelly is the praise team leader at our church! I loved how the layering in this layout turned out. If you look close, you will also see a couple of hidden music notes that I cut on the Cricut and placed inside!

Funny story: Shelly and I were 2 years apart at a small Christian university, lived in the same dorm and never knew each other while we there. It wasn't until MANY years later when my hubby and I started attending our current church, where Shelly is the praise team leader, her hubby is the asst. pastor and my hubby plays guitar in the praise team, that we discovered our alike past! She is such an amazing friend to me now that I only wish we would have actually met back in those days of college so we would have had an additional 16 years of friendship . . . but God's plans aren't ours and He chose when to bring us together!


June 14, 2011

Wedding Day Wishes!

Recently our designer Jen T celebrated her anniversary to husband Mike. She created this wedding layout from their special day. Congrats Jen and Mike!
Deb♥


June 13, 2011

Happy National Dairy Month

Aren't the milk moustache ads fun? The Groovy Chicks and I decided to get into National Dairy Month. Wanna see how much fun we had? Cool!

Here is the order of our crazy selves:
Me, Heather, Jen T (2), Darlene, Michelle, Silvana :)
Deb♥


June 12, 2011

Up Close and Personal

How cool that Doreen is bringing us a layout today from SERENDIPITY??? I think it is uber cool to get close ups of the kids at any age~Good going Doreen!!!
Deb♥


What can I say about this layout other than it really has no purpose except to be silly! We were standing in line at Serendipity in Vegas and the line was taking a little longer than I had hoped, so being bored I snapped the close-up pic of Joseph just to be funny! Well, after viewing it I actually liked it, and thought it would be cute to get a matching pic of Madison. Of course, by this time, she knew what was going on so I couldn't surprise her, but her pic came out cute too so I decided to keep it and scrap them together w/ the first title that came to mind...
This just goes to show boredom is not necessarily a bad thing!

June 11, 2011

What is Your BirthVerse?

Heather and I have been working together here at IIG for a very long time and she never stops amazing me with her projects! This one below is a great example of that! I have a soft place for Faithbooking layouts. Read on!

p.s. My BirthVerse is:

Psalm 9:9 NIV
The LORD is a refuge for the oppressed, a stronghold in times of trouble.
I Like It! Definately planning a lo with that...thanks Heather!
Deb♥


Did you know that everyone has a Birth Verse? It's true! You can find out what your verse is at www.birthverse.com. Proverbs 4:27 is my triplets birth verse. It says (NIV): "Do not swerve to the right or left; keep your foot from evil."

I had the perfect pic of my boys' feet while they were laying on the floor watching cartoons. I thought it would be really cool to scrap that picture with their birth verse.

I had a lot of fun with this lo. I didn't want to "grunge" it up too much but I am not sure I know how to do a layout otherwise! (haha) I had some fun using grungeboard in ways I hadn't before.

On the grungeboard flourishes, I embossed them with walnut strain distress embossing powder. After it dried, I wiped a little off with my finger and then too walnut stain distress ink back over it.

On the grungeboard arrows, I painted them white. When dried, I sanded the top just a little. I then took walnut stain distress ink over the top and worked it into the embossed grungeboard. I then took a wet papertowl over the top lightly to take a little of the ink back off and make it look more whitewashed.

I used Basic Gray Recess collection. The title was created on my gypsy. The verse was printed on my computer and then I layered it on a Technique Tuesday tile and sanded and inked.

Why not look up your birth verse or someone in your family and create a layout incorporating the verse? I plan to do one for each member in my family!


June 10, 2011

Jen Goes Hybrid!

Have you heard of the term GDA? It means Good Deal Alert :) When I was heavily couponing a few years ago I ran into GDA's quite a bit, wish we did more often than we do nowadays! Well, when I hear of a GDA for pics I have to pass it along. Here is a great example in how that worked out for Jen! Pretty too :)
Deb♥

A while back Deb told me about a deal that Walgreens was having for a short time that you could get a free collage print with the special promo-code and well, it worked! :) I ordered it online and picked it up at my local store free of charge:) it was great! And so, I thought when I was picking out the pics ,to put my favorite pics from the year and put it on a page as my year in review. I just
love it and it was a super quick page! Tfl!

June 09, 2011

Get Behind Your Photos!

I think this is a fun technique that Michelle is sharing today! Have you tried it before? It can be freeing :)
Deb♥


I For this page I tried out for the first time a technique I saw done on a page. The page I saw was a heart torn and rolled up with a 8x10 photo behind it! I love the effect and changing it up a bit from just matting your photos!

The idea behind this technique worked great with my photos. Since my daughter was "stuck" behind the torn frame. When I took this picture all my daughter kept doing was throwing her hands up in the air and saying, "Stuck" "Stuck"! So that made my title easy.

To make this page I placed my photos behind the paper with the print side down and traced the space of the photos I wanted shown. Then cut and "X" with my craft knife flipped over the paper and started rolling back the paper. If it got too bulky I rip off the extra bulk and kept rolling until it fit the photos. When I was happy I inked up the rolled edges and then placed my picture behind. I also adhered a strip of paper to the back with the pictures for support. I used my alpha stamps, cut them out and pop dotted the letters around the torn frames. Fussy cut one edge of my journaling tag, rolled the other edges and inked.


June 08, 2011

Create Your Own Embellies!

Silvana is sharing a very sweet Dollbabies layout with us today. She also is giving good advice about creating something from something else. Check out the focus on her cute birdie!
Deb♥

Today I want to share a simple layout and as most of the time in my layouts I like to put just one big picture and use a few embellishments . For this page I used a pic of my daughter from last year went she started crawling and usually I choose the colors of papers and embellishments base on the clothes she is wearing (silly but it works for me , how do you girls choose your paper and colors? ...just curious ) but in this case I had a set of embellishment that I haven't used yet so I took this tag that say "giggles" and I start my layout from there. I like this pink and blue with a little bit of green. The other thing is that I wanted was a little bird for this page, but I didn't have any so from a blue butterfly chipboard I made this cute little birdie =). Hope you girls like it =)


June 07, 2011

Serendipity by Darlene

Last but not least Darlene is here to show us what she can do with Serendipity. Her daughter is always a cute model so she could not go wrong here!
Deb♥


Serendipity squares? What in the world is that??? Well, my dear bloggy friends, serendipity squares are just too easy and fun to make. Just use any scrap paper in your choice of colors/patterns and glue. Tear your papers in any fashion you like and paste down on a 12x12 sheet of paper. Sounds too easy? IT IS REALLY! And this month on If It’s Groovy, the challenge is to make a serendipity layout. Fun!

I’m pretty happy with the way this layout turned out, and the layout pretty much made itself once I had the background done. I just used 4 sheets of different yellow, red, and blue paper and Modge Podge glue to get it all to stick down. I found that I used about 4x4 inches worth of each paper to make the background. I think I will totally use this technique again when I have scraps laying around. :))

Don’t forget to join me for the fun challenge of making your own serendipity squares layout on IIG. :) I’d love to see what you come up with.


June 06, 2011

Serendipity by Silvana

I love how Silvana made this challenge work for her in her own style! That's what scrapbooking is all about, being challenged but doing it your own way :) Loving also the decorated embellie!
Deb♥

Hey groovy girls today I have to share my take on this month challenge "Serendipity Challenge" and my work is usually clean and simple so to trying to do a background for my layout with lots a little pieces of papers was hard ...I try =) but I couldn't stand the busy background LOL , so this is what I come out with... still a little busy but I thinks it looks fun =)

I had a package of this square scraps in a few colors for a long time and I haven't use it in a while so this challenge was the perfect excuse , first I pick a picture , then choose scraps in some the colors of the trim in the towel that my DD is wearing, and I glued them to a white cardstock .... but I thought they looked all over the place so I got my sewing machine and sewed all around and in between the scrap to make look like one piece of paper (hey check out the thread , it changes color from white to pink I love it ) after I have my background ready glue the pic and star to look for matching embellishments ....and I found this cute hippo that kind of matched my DD's hippo towel( it was a boy hippo but I make it a girl adding a flower and a pink banner LOL) and that's all , I hope you girls give this technique a try too if you haven't yet.


June 05, 2011

Serendipity by Jen T

Watch as Jen shows us two ways to use serendipity in scrapbooking and cardmaking. I love how she has turned a wedding layout into a fun and not-so-stuffy page!
Deb♥

Sometimes the paper and the picture are just meant to be together...a marriage of sorts(pun
intended! ..lol!)...that is what I thought when I pulled out the scraps of these papers and the
picture of my husband and I posing for a pic at our wedding. And so I just let the paper scraps tell me where they wanted to go and the hearts in the patterned paper made me think of adding a heart frame and die-cuts and then the page just came together from that..


I loved using up my
scraps so much for this challenge...I even made this silly little card for my daughters lunchbox.

June 04, 2011

Serendipity by Doreen

Here is another Groovy Chick putting her spin on the challegne this month having never tried it before. Trying new things can be a lot of fun and secretly addicting if we aren't watching out, lol! Look at what Doreen has brought us today :)
Deb♥


I had never heard of Serendipty squares before this challenge.
The basic concept is to rip or cut scraps of paper into 1-2 inches in size and randomly adhere them to a piece of paper to create a new piece of paper. It is suggested that the paper scraps used are w/in the same color family so that they blend well together.
It is an interesting technique, but could I do it?
I went thru my stash of scraps, but unfortunately, regardless of the fact that I had tons, I just couldn’t envision any of them together.
Feeling a bet frustrated I went thru my pictures. As I was looking my eyes locked in on these pictures of my kids at Disneyland. What grabbed my attention were all the different colors on the pictures. They were so bright and fun and at that instant I knew I was going to go a another route w/ my layout: instead using papers in the same color family I was going to mimic the colors in the pictures and make my squares out of lots of different colored papers! Once that was decided, the layout creating process was a snap!
While I was looking thru my scrap stash I came across some $1 Target Card Making kits. In those kits was an assortment of different, bright colored envelopes. I knew I wasn’t going to use the envelopes as is, so I grabbed them and my square punch, and punched until there was nothing left to punch!
After that was done, I chose my BG paper. I knew I wanted some of the BG to show so I chose white since my squares were already full of color. As the rules say, I randomly adhered my squares here and there and everywhere! That part was a lot of fun. I felt like a little kid in art class!
With the main part of the layout done, it was just a matter of adding my pictures, title and journaling strips (white to balance out the white BG) and a couple of flowers as accent pieces. I also went back and outlined the squares you could see w/ my Zig pen just to add a little extra dimension.
All I all it was a fun quick layout to create!


June 03, 2011

Serendipity by Michelle

I love the team we have assembled here at IIG. I hope you do too! Most of us have been together for a very long time now and Michelle being our newbie is fitting in nicely when I hear how she was wanting to try Serendipity :) Go girl! A nice shout out to Jen, her Sister Chick, for a great idea that I know will make Michelle's daughter a happy little girl too! Read on...
Deb♥


So we were given this challenge create a page using Serendipity Squares. I have always wanted to try using Serendipity Squares in a project. I am so glad that I was challenged to do this!

The pictures I used on this page were originally planned to be used for my Absolutely Incredible Kids Day Challenge-Letter to a Child, but the colors in the picture were not working with the papers I wanted to use. Well, I am so glad that it happened that way! Because I love how this page came out!

I used ripped up scraps of purple, turquoise and pink. Added images of Taylor Swift that I found online and shrunk down to the size of the scrap pieces. Also copied some of her song lyrics too! I torn them up and randomly placed them over the entire surface of my 12x12 paper. I didn't place them under the pictures, but made sure there was some overlapping. I had already had matted my photos from the original plan so I just inked up the edges with Close To My Heart Blush Ink. I used Basic Grey-mini monogram sticker letters in Granola. I only matted them on the purple because they got lost by themselves.
Under each photo is journaling attached to the floss you can see on the page. One reads: "You the best thing that's ever been mine!" A line from the song "Mine" and the other is about how we came to these pictures. The other reads: "We were shopping with Grandma. Looking for hair clips for your Christmas pictures. You found these glasses and put them on. My Little Taylor Swift!" That's what came to my mind and when I grabbed my phone to get the pictures. Becky, my daughter totally reminded me of Taylor in the video from "You Belong To Me".

So, the best part of all was how Becky went nuts when she saw the page. Saying, "It's me and Taylor!" "I love it! I love you Mommy!"

I want to thank Jen(DT-If It's Groovy)for the idea of putting the page in "12x 12 frame in her room she'd prob love that...so she can look at it all the time....." I love that idea!

June 02, 2011

Serendipity by Heather

I don't think it is a big secret that when I come up with a challenge I want it to be "out there" so I don't typically choose the kind of challenge you may find everywhere else. I want to push The Groovy Chicks and our awesome friends who play along to do something outside of the norm. Look what happens when Heather is challenged! One word: Art!
Deb♥


I was not so sure about this challenge at all! Yes, I have lots of scraps but that wasn't the issue. My problem was making a lo using so much patterned and colored paper and yet not have it detract from the picture. Well, I think I just may have figured it out!!!

I took some Scenic Route paper that I had left over and began cutting into all different sizes of squares/rectangles. I knew I wanted this paper as my background because the pic was taken during the 4th of July parade this past summer. I wanted the red/white/blue/star theme to prevail.

By matting the pic on a solid red piece of paper and then using the arrow and other embellies to frame around the pic, I think it pulls the eye right to the middle and to the picture.

I did have to do some doodling on the arrow and journaling spot so that it wouldn't blend into the background so much! But overall, I was pleased with the "quilted" look of the lo! Will definitely be trying this again!!!

June 01, 2011

Are You Interested in our June Challenge?

This month The Groovy Chicks will be showing their works Serendipity Style. Have you created serendipity before? Take pieces of similar colored pieces of scrap paper, tear them into somewhat equal shapes, then adhere them to a cardstock of similar color. It is a GREAT way to use your scraps!!!

Here is mine to start us off this month! MY daughter dressed up as a beautiful doll of Asia for Halloween 2010. I had a hard time finding just the right paper so I created mine this way.


Come on back over the next week to see all of the designers showing theirs as well :)

Thanks for being here!
Deb♥

Don't Miss a Thing! Sign Up for Groovy Mail! Safely Subscribe!

Enter your email address:

Delivered by FeedBurner

Where You Be?

Sign the guestbook while you're here!!!