Deb♥
Translate
Showing posts with label Stamping. Show all posts
June 27, 2012
Good Riddance Rubber Stamps
This is a mere portion of my rubber stamps that were sold the other day...I was so shocked when I counted the two lots that I sold and had almost 500! What?!?! I kept 5! My craft room is well on it's way to a new look! Do you have more stamps than I had? So curious!!!
Deb♥
Deb♥
February 29, 2012
On the Red Carpet
Tami over at the Fiskateer site has challenged us to create a layout based on someone who was inspiring us at the Academy Awards.
I thought Angelina Jolie looked so beautiful in her black dress and her stunning red lipstick.

I made this after seeing her :)
I thought Angelina Jolie looked so beautiful in her black dress and her stunning red lipstick.

I made this after seeing her :)
January 19, 2012
A Retro ATC from Sheena
It is so awesome when an artist finds a new passion! Sheena is tapping into that as she comes back today with a new ATC. This is another example of awesome small arts!
Deb♥
I am fairly new at making ATC's, I am enjoying the learning process. ATC's are also a great way to try out new techniques. For this ATC, I was playing with some new stamps and layering different ink colors. This was a lot of fun to make and I love the message to "Enjoy Life".
Deb♥
I am fairly new at making ATC's, I am enjoying the learning process. ATC's are also a great way to try out new techniques. For this ATC, I was playing with some new stamps and layering different ink colors. This was a lot of fun to make and I love the message to "Enjoy Life".
September 08, 2011
Cards by Viji
Viji is sharing a neat little trick with us today...get the ink out!
Deb♥
I wanted to show you how to make some very easy cards. I love stamping and it is a fun way to create your own pattern paper. I looked through my stamps, selected a few and just started stamping. Then, I added some ribbon and stamped the sentiment. I had a plain orange ribbon, so I stamped the little flowers on it to match my pattern paper. This was my first experiment with stamping on ribbon and I really liked the way it came out. I am definitely going to do more ribbon stamping in the future. Let's see what stamps you have hiding in your treasure and get stamping!

Deb♥
I wanted to show you how to make some very easy cards. I love stamping and it is a fun way to create your own pattern paper. I looked through my stamps, selected a few and just started stamping. Then, I added some ribbon and stamped the sentiment. I had a plain orange ribbon, so I stamped the little flowers on it to match my pattern paper. This was my first experiment with stamping on ribbon and I really liked the way it came out. I am definitely going to do more ribbon stamping in the future. Let's see what stamps you have hiding in your treasure and get stamping!

August 11, 2011
Paint!
If you have not used Acrylic paint for awhile why not break it out of hiding and put it to use again? It is so much fun to use and it gives a look that you cannot get from stamp pads. Let's see what Darlene has made with hers and a few Raisin Boat stamps and a robot stamp also from her stamp stash:)
Deb♥
This brick background was made with the ultra fabulous Brick Raisin Boat stamp and some mixed acrylic paint (so the paint would dry thick and extra textured). I also combined this card with the Get In Gear set, which made my gears look fabulous!
Deb♥
This brick background was made with the ultra fabulous Brick Raisin Boat stamp and some mixed acrylic paint (so the paint would dry thick and extra textured). I also combined this card with the Get In Gear set, which made my gears look fabulous!
April 21, 2011
Coloring with Copics
Heather would like to show us how she enjoys Copic markers...the stamp is so cute! See you next week with another ;)
Deb♥

I must admit that I was not sure about the Copics when I first started hearing about them! But as soon as I tried them and found how wonderful they are to use, I never looked back! I mainly use them to color digital stamps! A lot of times I will color and color and color and . . . but then when I need a card, I can grab one that is complete and put a quick card together for just the right occasion! Sometimes I even make up the cards and just add the sentiment when I am in quick need of a card! Hope you enjoy these cards I made using my Copics! I have always enjoyed coloring with crayons since I was little. I always found coloring to be very relaxing and stress-relieving! Now I have just changed from crayons to Copics!
Deb♥

I must admit that I was not sure about the Copics when I first started hearing about them! But as soon as I tried them and found how wonderful they are to use, I never looked back! I mainly use them to color digital stamps! A lot of times I will color and color and color and . . . but then when I need a card, I can grab one that is complete and put a quick card together for just the right occasion! Sometimes I even make up the cards and just add the sentiment when I am in quick need of a card! Hope you enjoy these cards I made using my Copics! I have always enjoyed coloring with crayons since I was little. I always found coloring to be very relaxing and stress-relieving! Now I have just changed from crayons to Copics!
November 20, 2010
Heather's Hubby
Have you taken a pic of YOUR hubby this new year? Take one today and create a lo he will not forget :)Heather did!
Deb♥

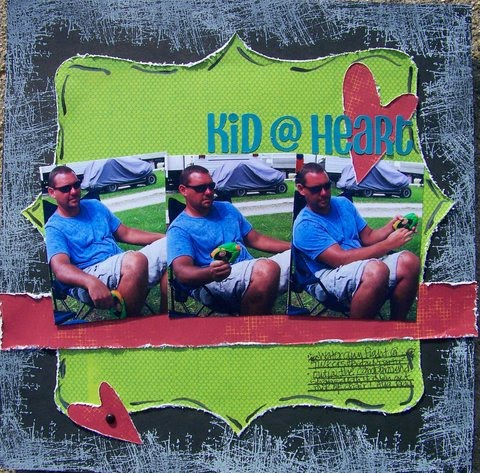
Sometimes I get so wrapped up in scrapping my kids - heaven knows that there is a lot to scrap and I am WAY behind - that I forget that my kids would probably also enjoy seeing layouts of their father and what an amazing fun dad he is!!
These pictures were taken out at the campgrounds this summer during my nephews birthday party! A spontaneous water gun fight broke out! It was lots of fun! And as you can see, my hubby participated in the fun, but somehow never had to get out of his chair!!!
I took some Timmy stamps and used a white ink pad to stamp the edges of the black cardstock. Loved how it turned out!! Then I cut the shape on my cricut, distressed the edges and then used some silver and black smooch for the lines around the edges. A little distressing of the paper strip and the hearts (with a brad through the middle of one) and ta-da! Fun simple page! Not heavily embellished but just the look I wanted!! (Side note: Hearts and title cut from Don Juan cartridge.)
So, don't forget to scrap those "older" men in our lives, as well as the little ones!!
- Heather
Deb♥

Sometimes I get so wrapped up in scrapping my kids - heaven knows that there is a lot to scrap and I am WAY behind - that I forget that my kids would probably also enjoy seeing layouts of their father and what an amazing fun dad he is!!
These pictures were taken out at the campgrounds this summer during my nephews birthday party! A spontaneous water gun fight broke out! It was lots of fun! And as you can see, my hubby participated in the fun, but somehow never had to get out of his chair!!!
I took some Timmy stamps and used a white ink pad to stamp the edges of the black cardstock. Loved how it turned out!! Then I cut the shape on my cricut, distressed the edges and then used some silver and black smooch for the lines around the edges. A little distressing of the paper strip and the hearts (with a brad through the middle of one) and ta-da! Fun simple page! Not heavily embellished but just the look I wanted!! (Side note: Hearts and title cut from Don Juan cartridge.)
So, don't forget to scrap those "older" men in our lives, as well as the little ones!!
- Heather
November 05, 2010
Stamping and Flower Soft
Have you seen this awesome product called Flower Soft? Let's take a look at how Kelly uses it with the steps below and thn forming a perfect card!
Deb♥


Sometimes dry and heat embossing just aren't enough. A design needs some PIZAZZ! I'm sharing my first experiment with Flower Soft. Using this large stamp, I dabbed on 3 different colors of ink...(remember to "HUFF" on your stamp to make sure it's moist right before you stamp onto your paper). Once I have my image stamped, I randomly select areas to outline with my fine-tip glue pen. I shake on some Flower Soft (I'm using "Heather"), let it adhere, and then shake off the excess back into the container. On this last photo, I heat embossed the stamped outline of the bicycle with black sparkly embossing powder, and then just added the Flower Soft for the flowers in the basket. I placed it inside a window card and groovy! Now, if it was a really GROOVY bike, it would have a yellow and lime green flowered banana seat, just like mine did when I was 8. However, since I am no longer 8 years old, I think this Flower Soft added just the PIZAZZ I was looking for!
Deb♥


Sometimes dry and heat embossing just aren't enough. A design needs some PIZAZZ! I'm sharing my first experiment with Flower Soft. Using this large stamp, I dabbed on 3 different colors of ink...(remember to "HUFF" on your stamp to make sure it's moist right before you stamp onto your paper). Once I have my image stamped, I randomly select areas to outline with my fine-tip glue pen. I shake on some Flower Soft (I'm using "Heather"), let it adhere, and then shake off the excess back into the container. On this last photo, I heat embossed the stamped outline of the bicycle with black sparkly embossing powder, and then just added the Flower Soft for the flowers in the basket. I placed it inside a window card and groovy! Now, if it was a really GROOVY bike, it would have a yellow and lime green flowered banana seat, just like mine did when I was 8. However, since I am no longer 8 years old, I think this Flower Soft added just the PIZAZZ I was looking for!
September 06, 2010
Versamark
Recently I was asked about using Versamark, so I created a project to give a little plan to do so. Hope it helps!
First I began with the following items. It is important when stamping with embossing powders that you are prepared to work rather quickly even though the Versamark ink is tacky and slower drying than other inks.

turned the Versamark ink pad over onto the stamp to "ink it up"

stamped on my paper and quickly dipped it into UTEE

shook off the excess

heat embossed

restamped the same stamp with other inks and stamped over the clear images made by the Versamark

stamped
UTEE again
First I began with the following items. It is important when stamping with embossing powders that you are prepared to work rather quickly even though the Versamark ink is tacky and slower drying than other inks.
turned the Versamark ink pad over onto the stamp to "ink it up"
stamped on my paper and quickly dipped it into UTEE
shook off the excess
heat embossed
restamped the same stamp with other inks and stamped over the clear images made by the Versamark
stamped
UTEE again
reinked the same stamp in this YUMMY ink by Ranger
It looks like this open and smells good too!
Press stamp into the ink
August 09, 2010
Let's Check in with The Groovy Chicks: Jen T
I asked The Groovy Chicks to talk with me about their layouts that line down the page here at If It's Groovy. Here is what Jen has to say :)
This lo of me I loved the already dashes border but didn’t like the design on the bottom left corner so I matted my PIC on pp and put that on top of the old design. Then I laid out my flowers to the heart design and then glued them in place. I then topped them with a red gem. The "me" title I added dimension by layering two colors of the same font slightly off each other. then I stamped red swirls onto both sides of the heart and added a diecut corner with another red gem. lastly I just carried black dashes around my PIC and outlined the photo and mat in red to give it a little pop 

August 04, 2010
Stamping Owls
Here is a cool card from Heather today!
Deb♥


What fun I had making this card!!! I am using it for a Fathers Day card for my hubby but could be used for many different occasions!
To make the tag, I swiped Scattered Straw and Dried Marigold distress ink next to each other on a craft sheet. I spritzed it with water using a mini mister. I then placed my tag on the ink. I would push it down and pick up and move it and push down again. I then used a heat tool to dry the tag. After dry, I stamped the owl onto the label using Brushed Corduroy distress ink. I then stamped the limb using Forest Moss and Crushed Olive distress inks. I then again spritzed a small amount of water on the image and then dried again. I then used Glue Dots to attach the googly eyes. I used a blending tool to add a few other colors of distress inks to the sides of the tag. Then I tied some jute through the ribbon hole.
On the inside of the card, I cut a piece of cardstock to fit inside. I ran some Brushed Corduroy distress ink around the edges and stamped a small owl in the corner. I used some Cosmo Cricket letter stickers to put the sentiment on the inside "owl always have eyes for you".
The actual card, I used a white core cardstock. I took a file around the edges to pull out the white core and then again distressed with Brushed Corduroy.
Ta-da! I love the way it turned out!!! And I got to play with a new technique of using my distress inks!! Hope you enjoy!
Deb♥


What fun I had making this card!!! I am using it for a Fathers Day card for my hubby but could be used for many different occasions!
To make the tag, I swiped Scattered Straw and Dried Marigold distress ink next to each other on a craft sheet. I spritzed it with water using a mini mister. I then placed my tag on the ink. I would push it down and pick up and move it and push down again. I then used a heat tool to dry the tag. After dry, I stamped the owl onto the label using Brushed Corduroy distress ink. I then stamped the limb using Forest Moss and Crushed Olive distress inks. I then again spritzed a small amount of water on the image and then dried again. I then used Glue Dots to attach the googly eyes. I used a blending tool to add a few other colors of distress inks to the sides of the tag. Then I tied some jute through the ribbon hole.
On the inside of the card, I cut a piece of cardstock to fit inside. I ran some Brushed Corduroy distress ink around the edges and stamped a small owl in the corner. I used some Cosmo Cricket letter stickers to put the sentiment on the inside "owl always have eyes for you".
The actual card, I used a white core cardstock. I took a file around the edges to pull out the white core and then again distressed with Brushed Corduroy.
Ta-da! I love the way it turned out!!! And I got to play with a new technique of using my distress inks!! Hope you enjoy!
March 29, 2010
Stamp Kitchen Style
Our Lead Stamp Artist here at If It's Groovy is Peg and she came up with a great idea to find something to use in stamping your project while cleaning your house. Hit up your junk drawer!


I also took Peg's challenge! I used the inside of my Basil shaker because it was close to empty so why not right? I then used my fancy scissors and cut around that stamped image, added a punched image behind and presto a homemade embellie :)

http://ifitsgroovy.ning.com/group/Stamping/forum/topics/marchclean-the-house-challenge


I also took Peg's challenge! I used the inside of my Basil shaker because it was close to empty so why not right? I then used my fancy scissors and cut around that stamped image, added a punched image behind and presto a homemade embellie :)
We would love to see your take on this one too! Come on over to the NING site here:
http://ifitsgroovy.ning.com/group/Stamping/forum/topics/marchclean-the-house-challenge
February 27, 2010
Stamping the Luv~DT CALL
Stmaping is NOT a thing of the past! Let's be sure to break them out more often and put them to use. They actually look great outside of their packages too, promise, lol! Peg shared a lo using her heart stamps for February and as we try to build a team for her I am working alongside of her :) Here are our layouts.
If It's Groovy is looking for someone to join our stamp team. Please email groovydeb@yahoo.com for more info!
Peg

Deborah
If It's Groovy is looking for someone to join our stamp team. Please email groovydeb@yahoo.com for more info!
Peg

Deborah
July 20, 2009
Stamping Backgrounds!
I think this is a new way to use several stamps on one layout! Check out all of the many choices Lead Stamp Artist Jill has chosen to frame her model!!!
June 19, 2009
Flashback Friday with our Stamp Team
Our Stamp Team surprised me this month when unbeknownst to them they chose the SAME sketch to work with that DT member Jen of the Dollbabies team used yesterday! Here is the stamp team's spin on that Fiskars sketch...
Jill-Lead Stamp Artist


Jeanette-Stamp Artist

Jill-Lead Stamp Artist


Jeanette-Stamp Artist

May 19, 2009
One Sketch, Two Stamping Designers

Here is a Pagemap sketch which is a piece of art by itself! Our stamp team show us two very different and beautiful takes on it!
Lead Stamp Artist Jill


Stamp Artist Jeanette:


Subscribe to:
Posts (Atom)