Follow this blog with bloglovin

Follow If Its Groovy

Translate

October 31, 2010

Happy Halloween Boo!

Boo from Groovy Deb♥


Boo from Darlene!


Boo from Heather!


Boo from Jeannie!


Boo from Natalie!


Boo from Jen!

October 30, 2010

Happy Halloween Heather Style

Did you make your little goblins a handmade card this year? Here is some last-minute inspiration coming from Heather!
Deb♥

I made these cards last Halloween after buying these cute stamps at Archivers. I then used colored pencils to color them in.


Bewitching Projects Using Cricut

Here is a bewitching little treat from Natalie today!
Deb♥

This little Witch Gift Bag was cut out using the Cricut cartridge Plantin Schoolbook giftbag option. There are several shapes to choose from. I also used the little Witch cutout on the Celebrate with Flourish Lite Cartridge. I used a coordinating green ribbon to decorate the gift bag.
Depending on what size of Cricut you have and the cutting mat, you can make this little bag on a 6 x 12 or 12 x 12 format at almost any size.

October 29, 2010

Halloween Step Up Card

I recently made a Halloween card called a "Step Up" card and am sharing this today. I have to admit it was very challenging, but I am excited to give it to my daughter on Halloween this year! It has cuts in the middle of the card so peaks and valleys would be the technical term. I stamped little Halloween images from Fiskars stamps I have made by Heidi Grace and added real candy wrappers in the cauldron.
Be sure to Google "step up cards" and look for dimensions for making one of these cards and send me a shout if you have one to share :)

Happy Halloween Ghoulfriends!
Deb♥


Jen's Crafting for Girl Scouts

Trick or Treat Jen!
Deb♥


I love Halloween and as a special project I was recruited by one of the girl scout moms of my daughters troop to make these fun Halloween pins for her to give to all the girls as part of their Halloween present from her. They are ribbon flowers that I make by looping 4 inch pcs of ribbon and layering them together to make a flower.Then I stickled the felt circles I cut from felt and the orange flowers. Then I added glittered pumpkin stickers on top I found at the craft store. Lastly, I added a pin to the back to them. Happy Halloween crafting!!!

October 28, 2010

Twitching Witches


Did you watch Bewitched when it came on TV? Maybe you catch it late night on the repeats? I loved Bewitched! I loved that with a twitch of her nose that she could make things happen, usually for the better. What if it were that easy? Imagine how much we could accomplish in one day!!!

I made this Halloween-style layout to add to my All About Me book. This shows that I was watching TV as a child when times were much more simple then they are now. I don't want to lose sight of the small things like a woman who was unusually different having the ability to make her marriage work with her husband that she adored being unusual and different in his own ways too.

Now let's talk about Samantha's Momma! Endora, what a mother-in-law she was to "Durwood". I am not sure that there isn't a mother-on-law that at sometime would not mind turning her son-in-law into all the things she would do to him, lol!

Be sure to record something about the TV shows you liked as a child and like today :)
Deb♥

Head to the Craft Store

Treats and advice from Natalie, great combo!
Deb♥


I have never dressed up a candle before and always wanted to. I took this Halloween as an opportunity to do such and pulled a Yankee Pillar candle out of the closet. The scent is Harvest so it would work well for any Autumn holiday.

I saved up and bought the Cricut Lite Celebrate with Flourish cartridge from Wal-Mart and used my Cricut Expression to cut out the cute pumpkin pieces. I used a coordinating green ribbon and glued it to a piece of black cardstock that I had measured to fit around the base of the candle. I also used a pair of pattern scissors to add some flare to the cardstock base. I glued the pumpkin to the cardstock and used my fingers to mold the pumpkin into a shape that would fit the candle. Then I glued the pumpkin to the candle and glued the two ends of the cardstock together in the back using Scotch's quick dry glue.

The "Boo" was cut out using a third party cutting program and I embossed it in my Cuttlebug with Swiss dots. I used small glue dots to adhere it to the candle.

When using pillars it is important to first burn the candle when you really have some time to watch it and never let the wax melt over the edge of the candle or it will ruin the manner in which you want the candle to burn when it has been decorated. Once a pool of wax has melted to within 1/4 in of the edge blow it out. Repeat this every couple hours until some of the wax has evaporated enough and you have a nice lip around the edge of the candle!

October 27, 2010

Trick or Treat Jeannie!

Let's ring Jeannie's doorbell to learn more about what she made for us today!
Deb♥

If you have an occasion to give a Halloween card, I think my card with the PUMPKIN bag on the front would be so cute with a couple of goodies popping out the top.
This was one of the cards I received the supplies for after my mom passed away. Maybe I have mentioned, she was card maker EXTRAORDINAIRE. Funny thing about her, she thought she had no talents. This is just a duplicate of one of her EASY PEASY cards. To make this even more coincidental that I tell you of her...her nickname growing up was "PUNKIN." I kid you not.

The other card is a GROOVY and whimsical card. Oh, "PUNKIN" would have liked this one.
I just loved putting this one together with all the funky patterns an colors. Great card, don't think I be wearing these colors and patterns altogether anytime soon. Ha ha. There is your chuckle for the day!

October 26, 2010

Trick or Treat Time!

While web surfing at some of my favorite online websites I found a treat!!! Are you familiar with Design House Digital? Go there and sign up to be a member of their site and you can also sign up to receive a treat ") for Halloween!

Take a look here:
http://www.designhousedigital.com/jen-allyson/halloween-freebie


Halloween Heather is Back!

Heather is back with more Halloween fun!
:)
Deb♥

What a fun punch this is from EK Success! I punched the pumpkin face out of orange cardstock. I then used the Drippy Goo punch and then took some orange Stickles around the edges!!! Super cute, super easy! Pull out those punches and see what you can come up with!

October 25, 2010

A Sad Hallo-Whine


My youngest daughter and I were the sad and unhappy victims of Swine Flu last October :( If you were too let me send you my sympathies as that was so hard to get past! It caused us to not be able to go out Trick or Treating so I documented this with this layout showing how we were hallowhining and not halloweening. Hoping for a much better weekend coming up that's for sure!
Deb♥

Dressing Up Triplets


Seriously? Are these not THE cutest boys?
Deb♥


I made both of these layouts for a sketch challenge, and I absolutely love how they turned out! I loved the colors and the ribbons and the punched edges and the skull prima flowers! I used the Blackletter cricut cartridge for the titles and then inked them with Distress Inks!

Besides, what's not to love about 3 peas in a pod!! HEHE

October 24, 2010

Start Preparing Treats for The Little Ones


I have a bake sale coming and I am going to try this idea from Natalie...won't you?
Deb♥

A year ago I found this idea on a blog that I have long since forgotten the name of, but I kept the one I made and this year made a new, better example.

I used a bracket cutout from my Cricut Storybook cartridge, ran it through the Cuttlebug and embossed it. You can use any shape or design that you think coordinates. I then chalked the edges with white.

The "Boo" was cut out using a third party program with my Cricut and I chalked the bottom with black and the top with white for shadowing.

I also found a spiderweb file and cut it out. I put black glitter on the front of it and then put an orange glitter on every other leg of the web. I found an orange piece of confetti to put in the middle for more "bling"

I tied coordinating ribbon to a large yellow paper clip, glued the dried spider web to the paper clip using the Scotch quick dry glue.

You then fill a bag with goodies, staple the topper on and attach the paper clip and web to the top of that. You can glue the paper clip down to the topper if you choose to.

October 23, 2010

Halloween Minis!

Aren't these cuties Kelly has to pass out next weekend? Give it a try and be sure to let us know if you do :)
Deb♥


Eek! Monsters! These not so scary monsters were cut from a sheet by Reminisce. I think they are ADORABLE! I wrapped a piece of gum with the patterned papers (from Bo Bunny) and adhered that to a larger piece of cardstock (measures 2 3/4" x 3 3/4"). I used a regular circle and scalloped circle punch to give the monsters a "spot" to land on. I adapted this idea from a friend who had made some for Valentine's Day. My daughter just saw me posting these and has already put in her order for her classmates. Eek!

October 22, 2010

Tu Tu Cute for Halloween!

I created this lo using my favorite little Halloween punch of the season! It is small and wonderful. It came with a kitty punch too which I also used below. This is youngest daughter wearing her very hip Halloween jammies that were so cool that they came with a tutu! What more could a 6 year old dancer want? Candy?
Deb♥

TRANSLATIONS: DARLENE

Today is the final piece in our TRANSLATIONS layouts that we share with you this month. If you would like to enter yours please email groovydeb@yahoo.com :)

We hope you have enjoyed our takes on scrapping in a foreign language and now on to Darlene!
Deb♥


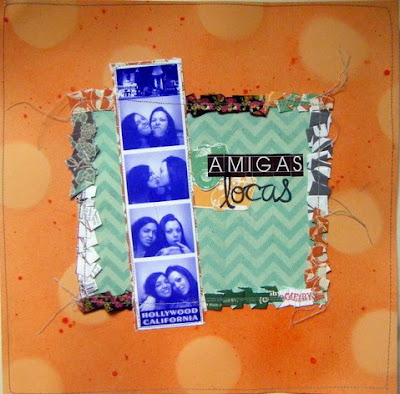
I made a super easy layout of a fun photobooth photo from November 2010, of my best friend, Nicole, and me, back when I was visiting her in California. This was our last day together and we went to Hollywood to explore for a bit. :) My title "Amigas Locas" means "crazy friends", and that sums our friendship and these photos up pretty well! :)

I never really knew how to scrap this photo until I came upon a beautiful designed layout by Tessa Buys (http://precociouspaper.blogspot.com/2010/07/tough-one.html) and just knew I had to lift the sketch! Isn't the negative space and various elements so interesting?

For my take on this sketch, I cut a rectangle mat for the center, and then I used 2 sheets of double sided patterned papers and cut 2 12x1/2 inch wide strips of each paper, using alternating patterns of the paper, for use on my center pleated frame. Once I was settled on which paper would be next to what, I pleated and sewed the pleats down to secure them permanently, and I left the loose sewing threads untrimmed (I rather like that look. :))

For my background paper, I used a plain orange sheet of 12x12 paper and I punched about 12 or so 2-inch circles with a circle paper punch out of scrap paper. I placed the circle punches scattered on the background paper, just allowing them to stay hoovered above the background with no adhesive (you may use removable adhesive if you prefer for this). I then used orange misting to spray the circles from up top, as to keep the shapes of the circle masks. I made some areas darker with mist than others and tried to get that blotched look throughout some spots as well. When I was satisfied with the misting work, I removed the circles and I was left with a super neat polka dot pattern on my background. Then I finally applied my center mat and frame and layered my photo and title on top. Lastly, I straight sewed the edges of my orange paper as well as sewed the edges of my photo down to the layout.

You can knock a layout like this out in less than an hour, and it is so fun!

October 21, 2010

Walgreens Halloween Treat

Quick quick quick!!! Walgreens is giving away a FREE 8x10 through this Saturday 10/23/10. Just use the code 8x10TREAT.

Happy Haunting!
Deb♥

Aprons!

A friend of mine, Denise,made this adorable little apron (and many others!) for an event where these were given to the women at her church for a special event. I asked her if I could share it with you. With the many holidays coming up this may be of interest to you when thinking of place cards for some of the women's activities you may be involved in too :) Thanks to Denise!
Deb♥

Boo!

Using some of my favorite scrappy paper scraps, Fiskars Circle Lever Punch and my Cricut with Paper Doll Cartridge I printed these c-u-t-e SCARY ghosts! I made it into a banner to hang and with good strong Glue Dots I adhered the candies. It was a fun way to get into the Halloween mood :0

Boo!

Clipart


Deb♥


October 20, 2010

TRANSLATIONS: JEANNIE


What a fun challenge the TRANSLATIONS challenge was. I am Native American, my tribe is Navajo. My mom is full Navajo but chose to put me up for adoption in hopes of having a better life than what she thought she could give me. In 1993, I was blessed enough to find my birth mom. I have been in contact with her ever since. Here is what the journaling says on my page.

"Tséníjíkiní
House of the Dark Cliffs People

I feel very honored to be Native American. In 2004, my husband, all my children and I went to Ganado, Arizona, where my grandmother lives. It was my first trip to the reservation and it was a humbling experience.

Do I feel sad that I was not raised on the reservation?

Maybe, but it doesn’t matter because I wouldn’t change the outcome of my life for anything.

I am blessed to have 2 families, the family that raised me and that family that is my blood, my clan.

I am Jeannie DeGruccio and I am Tséníjíkiní."

I put a lot of work into this page. I do not usually use my sewing machine on my pages, but this page seemed to be the perfect kind of page for machine stitching. I took my color palette from a Navajo rug. I tried to keep the colors and patterns true to what I might use, if I knew how to weave. I really had a lot of fun with this page.

October 19, 2010

An Important Scrapbooking Lesson

Read on, I think Jen T has important information to share with us today! Read on and please take note of what she has to share.
(((((HUGS Jen T)))))
Deb♥


A lesson I learned while I was doing this scrapbook page that I’d like to share with you ---Since my mom died in 2008 of colon cancer, I have found scrapbooking to be EVEN MORE therapeutic then when I first started years ago. Also, scrapping pictures of my mom has helped me with making missing her just a little easier. Though as I scrap the FEW great pics of her like this one here of her in her graduation cap and gown. (I Wish I had More PICS Of Her/Her and me). I also realized and learned a lesson as the main photo-taking person, make sure YOU get in those PICS as much as you can with your family, kids and friends! ....even if you hold the camera and turn it toward yourself! ....cause someday, there will be a day..Hopefully a long time from now that your family will want to scrap PICS of you to remember you. So make sure you give them a whole lot of pictures to choose from.) Happy picture taking!!! TFL!

October 17, 2010

Mandi is Hiding!

Do you ever have something to say but you just don't need everyone to read it? Hide it! Mandi is showing us today that a story can be told with a beautiful picture AND that it can be made uniquely for her precious baby to read when she is older. Read on...
Deb♥


Mandi told me:
It is a layout of my youngest daughter at around 2 months old, laying on me just staring at me.. There is hidden journaling, which is a letter to her, telling her to ALWAYS be her, no matter what anyone ever does or says and never be afraid of who she is!

Layout is 8.5x11

Paper is Basic Grey Green at heart

October 16, 2010

Shifting Gears

It is so nice to see a new boy layout! It's been awhile since we had one here on IIG! Heather is definately the one to show boy layouts, having several in her household, so let's see what she has to say today :)
Deb♥


I had sooo much fun doing this lo! I must admit, I would love to be able to do girlie lo's with lots of flowers and bling, but it just doesn't happen very often. I have 4 boys and 2 nephews on my side of the family. I do have some nieces on my hubby's side so occasionally I get to play with girlie scrappy goodness!

Thankfully, though, the scrap world is coming up with more and more things to use on boy lo's besides stars and buttons! Don't get me wrong . . . I love those things but sometimes I also want something more!

Well, thank you, Tim Holtz! As you can see on this lo of my oldest son Payton, I used Tim Holtz new Gadget Gears diecuts, as well as the metal Sprocket Gears on this lo! I LOVE how it turned out! I loved cutting the gears on my cuttlebug! (Yes, the diecuts are made by Sizzix but can be used on the cuttlebug.) I cut small circles to put on the back of the gears - but I glimmer misted them first so that just a little bling came through!!!

I have been using this collection of papers (The Paper Loft - Dude Collection) for a whole series of pictures that were taken at the campground last fall. The colors are perfect for fall and so BOY!!!!!

Hope you enjoy! - Heather

October 15, 2010

TRANSLATIONS: KELLY


Nothing fancy, because this time it is all about the precious picture of my daughter and our dog, Basso. Just using up some scraps of dog-themed paper and stickers on this irridescent pink patterned paper, some paper crimping, a title, and I'm done. I am a font fiend, and I love searching sites for free font downloads. I also have to give kudos to this website that I used to convert my title, www.freetranslation.com. I do not speak any foreign languages, but I can conjugate Latin verbs and decipher vocabulary (how useful is that?). My highschool Latin teacher would be so proud...semper ubi sub ubi (always wear underwear).

October 12, 2010

TRANSLATIONS: NATALIE


Tha gaol agam ort! I love you!
I love the Gaelic languages and even tried to learn Scottish at one time...not something you do when you have a newborn, so I had to put it on hold!

I come from a very mixed background, Scottish, Welsh, Irish, English, Dutch, German, French, and maybe some Native American and who knows what else!

I do tend to gravitate toward the Gaelic and Germanic part of myself the most. I plan on teaching my children about their rich heritage and how many nations and languages came together to form America and a very unique American spin-off of the English language!

Pink Cricut's Winner!


During our Think Pink online crop this past weekend we had a sponsor, Sarah of Pink Cricut (three cheers for Sarah!) (whoo hooo hooo) and out of all players blog hopping her winner has been chosen from the one and only IF IT'S GROOVY, yep!


Are you listening ~*Jen*~ of http://mymentalinstability.blogspot.com/ because YOU are one very lucky lady and will be receiving a $25 yummy!
CONGRATS!!!

9 Gifts for You Winner!!!


On my birthday 9/9 I asked people to comment on this thread and I would choose one winner to receive 9 goodies from me. I loved all the responses and wishes, thank you!


Ready to know who won?


That person is...


ScrappyRat!


Please respond by emailing groovydeb@yahoo.com with your snail mail address.

Think Pink Blog Hop Winner!

This Think Pink hop was so much fun and I wish Everyone could be a winner! I plan to visit all of you on your blogs and become followers :)


It is time now to announce the winner for this hop...


Drum roll please...


There person who has had her name pulled for winning this time is...


Keep Looking...


She has an M in her name...


She is MaryNSC!!!


Please email (groovydeb@yahoo.com) me your snail mail address for your goodies :)


Thanks again to all of you!!!

October 09, 2010

Welcome to the Think Pink Online Crop!!!


WELCOME to you! You have arrived on the first day of a Super Sized Blog Hop, AKA, Think Pink Online Crop that will continue from Oct9 today-Oct 11 :) To the right you will see Sarah of Pink Cricut is sponsoring us with a $25 gift certificate and she would like to see you commenting at each blog on this hop for your chance at the prize.


There are so many great blogs to check out, but chances are you arrived from Scrappin' Sista Hope you had fun there! Be sure to check this thread all the way to the end to see your next stop on the hop :)

Your Challenge is to create a layout based on this sketch that I created and my friend Pink Panther is generously holding up for all to see :) Do with it whatever makes you feel inspired :)
.


Here is my example for you too, based on this sketch I used MM Slice paper which is a line of paper supporting Breast Cancer Awareness! Making Memories is COOL, in a VERY UBER way! The line is so gorgeous. I also gave my title "The Girls" because well, these are my girls and we are talking about our "GIRLS" this weekend right? Do you like the waves? That is a Fiskars Making Waves Squeeze Punch~who said waves had to be blue when we are all about Thinking Pink this weekend?


Scrap your layout of any size using the color pink as much as possible and leave a link here for me to pick it up at your online gallery or find me at groovydeb@yahoo.com. You must be a follower to leave a message here. Have not signed up yet to follow? No problem just scoot down the page until you see the follower button :) You will have until Oct 11 at 11pm EST to enter. Yes Ma'am there are PRIZES (including new acrylic stamps and other new yummies too) will be given to a winner chosen by random.org . Be sure to look for the winner's posting on One By One The Flamingos Are Stealing My Sanity next Tuesday :)

Head on over to Oh Snap!

Have a good time one the hop and be sure to come back by anytime. You are always welcome!

Deb♥

p.s. If you get lost here is a complete list of our train stops:


1. One By One The Flamingos Are Stealing My Sanity – http://karelj.blogspot.com/

2. Gina’s Stamping Creations -- http://ginathorntonstamping.blogspot.com/

3. Crafting This Moment -- http://craftingthismoment.blogspot.com/

4. The Cricut Diaries – http://cricutdiaries.blogspot.com/

5. Sweet Sassy Diva -- http://sweetsassydiva-gspot.blogspot.com/

6. Scrappin’ Sista -- http://www.onescrappinsista.blogspot.com/

7. If It’s Groovy -- http://ifitsgroovy.blogspot.com/

8. Oh, Snap! -- http://ohsnaplizzie.blogspot.com/

9. Crazy About Cricut – http://crazyaboutcricut.blogspot.com/

10. Gen’s Den -- http://www.gensden.com/

11. Peanut Butter and Jelly Designs -- http://peanutbutterandjellydesigns.blogspot.com/

12. Heartfelt Creations -- http://tlbheartfeltcreations.blogspot.com/

13. Creations With Becka – http://creationswithbecka.blogspot.com/

14. Calie’s Creative Corner – http://caliescreativecorner.blogspot.com/

15. Tidbit’s Place – http://tidbitsplace.blogspot.com/

16. Gypsy Paperie -- http://gypsypaperie.blogspot.com/

17. Life From Marianne’s Table – http://number1aunt.blogspot.com/

18. The Suburban Crafter-- http://www.rachelstampshappy.blogspot.com/

October 08, 2010

Think Pink on SYTYCD

As we continue to bring awareness on the subject of breast cancer I quickly remembered a number from one of my favorite shows, So You Think You Can Dance. The choreographer actually wrote this for this purpose and I think it is definately worth watching. Take a look at the emotion displayed in the eyes and bodies of these beautiful dancers. Kudos to Tyse Diorio for choreographing such a moving piece of art which as we know comes in many many forms. Get out the Kleenex before you press the play button.
Much luv,
Deb♥


TRANSLATIONS: JEN T


When Deb gave us this challenge, right away I knew I was going to do something in Italian. Since I am half Italian (my grandparents were born in Italy on my moms side) I thought it would be cool to brush up on it. And I wanted to use up these old-school border strips that I got super cheap .(I love cheap!) ... so I combined the two things together to make a fun and colorful Italian scrapbook page of my girls....I even tinted the pic to add to the fun colors of the page.

TRANSLATIONS: MANDI


This is how I did my "translation layout".

This is a layout featuring my 4 year old daughter, Jessa.
Jessa has her moments with fits how ever, there is not a day
that goes by that she doesn't brighten my day. 99 percent of
the time Jessa is full of smiles, giggles and laughs.. she is really
such a character and definitely brightens my days and colors my
world! So for my translation, because of of my Italian heritage
I decided to use an Italian title and "translated it on the side.

Title : Tu Colori il mio mondo
Translation: You Color my world


Paper : All white card stock
Techniques paper tearing & Inking

Cricut- Alphalicious font, and accent essentials cartridges were used. The letters and circle were cut on white paper, and everything was hand colored.

Commencing Squishing?


See you tomorrow? Hope so!

October 05, 2010

Meet Guest Designer, Donna

Recently I held an online crop on the Fiskars Fiskateer website. Fiskars Ambassadors are known as Fiskateers. Fiskateers is more than a message board; It is a movement of those who love and use Fiskars products. If you have not joined you should check it out for yourself. Stop by www.fiskateers.com to tell them Groovy Deb sent you. You can get more info about participation...

In the meantime let me tell you about meeting Fiskateer Donna. She made some incredibly beautiful flowers that when I saw them I was awed! I know you will be too since they are so feminine and would make awesome embellies to any scrapbooking or craft project. Let's see what Donna can share with us about herself and the flowers...


1. Tell me about the start of your art, how did your crafting begin?

I would say I started crafting after I was married. I told my Hubby one
day that I really liked a macrame hanging I saw and instead of buying me the hanging, he bought me all of the supplies to make the hanging. I have been trying new crafts every sense.

2.Do you have a favorite technique that you use in crafting?

Stamping, I can't say I am great at this, but a scrapbook project just doesn't feel done until there is something stamped.

3.If you did not shop for one year, would your craft space be emptied or would you still have product?

With all the crafts I have tried and the product to go with them my crafting area would be stocked a year or more LOL!!!

4.If you could make an outfit from one scrappy paper line which would it be from?

Once upon a time, by Die Cuts With a View (click here for a visit there)!!! It is one of the first lines I started to play with and my scrap area isn't complete without some of it sitting around.
(p.s. I know the feeling!)

5. What makes you a Groovy Chick?

I guess I would have to say that what makes one a groovy chick is stepping outside the box and asking what can I learn next.

Thank you Deb. Donna


Paper Flower Book Tutorial

I made this book off the concept of Donna Salazar’s paper flowers; I loved them so much I decided not only to replicate them I wanted to add my own unique touch.

Here is picture of the supplies I used, but be creative when choosing the material for the various layers of flowers. I like to use newspaper, old book pages, doilies, napkins, and even fabric. I have also made these flowers using wrapping paper from my daughters wedding; it was a beautiful way to preserve a memory that normally would just be thrown away.

To start with I used a square of distressed cardboard box, simply peel away the thin outer layer to get the distressed look and lightly ink with a brown to give it dimension. For my paper flowers on this book I used dictionary paper, paper caper, paper towel, tissue paper, and one paper doily. Cut the various materials out into same size circles, I used three and a half inch circles for the two larger flowers. The smaller flower is made by using three inch flower punches, you can make the flowers any size you wish but you just need to make sure your circles are the same size for each flower in order to achieve this look.


I use a cardboard box to glimmer mist my materials in and I simply mist them until they are the color desired.
On a small scrap of paper place a hearty dollop of glue.


Layer your circles in the desired order then fold them in half and in half again creating the quarter fold. Snip off the end tip and then open flower back up and lay down with the middle hole in the center of the dollop of glue...


Now that your flower is on the glue use your fingers to press the flower into the center to give the ruffling effect and this will also work the glue into the layers giving it more stability. After your flower has the desired ruffled look let glue dry then punch a hole through the center of the flower, I use brads or buttons to give the flower a center and it will hold the various layers together.


After you have the flower complete trim around any excess backing paper you used when gluing so that it doesn’t show through, then attach to cover of book with glue dots.


I hope you enjoyed making these flowers as much as I did!
Thanks to Donna for sharing her art and a bit of her life with us today :)
Deb♥

Don't Miss a Thing! Sign Up for Groovy Mail! Safely Subscribe!

Enter your email address:

Delivered by FeedBurner

Where You Be?

Sign the guestbook while you're here!!!